
Most narration advice for beauty videos skips the first real question: should you even be recording your own voice?
For a lot of creators, the answer is no. The room they’re recording in is quietly sabotaging the audio, and no amount of relaxing into it fixes a bare bedroom with a fridge humming a few feet away.
This isn’t another tips list. It’s a case for matching the narration method to the video you’re actually making.
The room is the real problem, not your voice
The biggest gap between amateur-sounding narration and narration that’s fine isn’t talent. It’s whether the space is wrecking the sound before the words reach the mic.
A bare floor, a window, a flat ceiling, sound bounces everywhere in a room like that. Viewers read the resulting echo as cheap before they can say why.
Soft surfaces fix it. Curtains. A rug. An unmade bed. Clothes on a rail. People online swear by recording inside a closet stuffed with coats, and the coats are basically a free acoustic panel doing the work.
If the room’s genuinely bad and can’t be changed, that’s the actual reason text-to-speech deserves a look.
What TTS actually fixes
Text-to-speech turns a typed script into a spoken voice. Skipping the recording is the obvious win.

That matters more for step-by-step tutorials than it sounds like it should. Beauty tutorials run on precise instructions, how much primer, where to blend, what order things go on, and a TTS voice reads all of it at exactly the pace set for it, every time. A wording slip means editing one line of text instead of redoing a whole take, which is the kind of thing that adds up fast if you’re covering beauty and skincare content regularly and can’t afford to reshoot every tutorial from scratch.
That matters more for step-by-step tutorials than it sounds like it should. Beauty tutorials run on precise instructions, how much primer, where to blend, what order things go on, and a TTS voice reads all of it at exactly the pace set for it, every time. A wording slip means editing one line of text instead of redoing a whole take.
CapCut’s video editing software handles this on desktop with a built-in text-to-speech tool and an AI voice generator, type a script into a text layer and it converts straight into a voiceover on the timeline. The desktop version earns the extra step over a phone app mainly for timeline control, lining narration up against the exact frame where a sponge hits a cheek. It runs on most machines from the last decade, Windows 7 and up, macOS 10.14 and up.
A quieter benefit worth mentioning: since TTS works from text, the same script translates and regenerates in another language, a real shortcut for anyone trying to reach a wider audience with the same routine.
How to Add Text to Speech in Your Videos
Here’s how you can add text to speech in your videos using the CapCut desktop video editor:
- Import Video: Start a new project, import your video, and drag it to the timeline.

- Add TTS: Click “Text,” add a text box, and type your script. Highlight the text, select “Text-to-Speech,” and choose a voice. Adjust timing for sync. Moreover, you can also make your video more engaging by removing background from video, or adding effects and filters.

- Export Video: Preview the video, ensure TTS syncs well, and then export by selecting resolution and format.
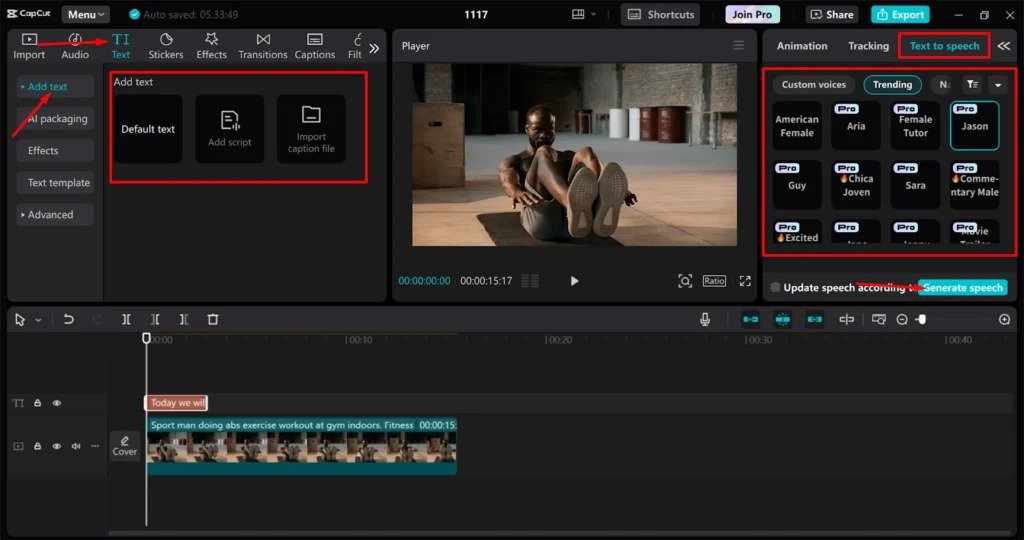
Your video is now ready with TTS narration!
Where TTS actually falls apart
Two places, and neither is minor.
Anything emotional or personal is the first. A generated voice reading “this moisturiser saved my skin last winter” sounds exactly as hollow as it is, because nothing was actually felt while saying it. Reviews, “why I switched,” storytime videos, the content that builds an actual bond with an audience, all of that needs a human voice behind it.
The second is quieter and matters just as much: brand voice itself. What makes a beauty channel feel like someone’s channel is partly how they talk, the verbal tics, the specific way they hype a shade. TTS flattens all of that down to one of three or four default voices, and a creator starts sounding interchangeable with everyone else using the same tool. For plenty of people that’s a worse trade than a bit of room echo.
So the split lands here. Instructional, repetitive, multi-language content, where precision matters more than personality, is usually TTS’s territory. Anything where the whole point is the person talking needs the actual voice, room problems and all.
If it’s your own voice, three things to sort first
The room comes first. Fabric over tile, windows shut, fans and AC off for the few minutes of actual talking, something soft behind the shot if the wall’s bare.
Mic distance comes second, and it’s the one people get backwards. Six inches from the mouth sounds dramatically better than mic-across-the-desk distance, on a phone or a cheap USB mic alike, because closeness means more voice and less room in what gets picked up. A pop filter, or just talking slightly across the mic rather than straight into it, kills the harsh popping on P and B sounds.
Cleanup comes last, and it pulls more weight than people expect. Most editors, CapCut included, carry a background noise remover for the leftover hum plus basic volume levelling so quiet and loud lines don’t yank a viewer around.
Which one to actually pick
Match the method to the video, not to whichever one sounds more professional on paper. A studio mic recorded in a bad room still loses to clean TTS. Clean TTS on an emotional storytime still loses to a phone held six inches from an actual mouth.
The creators who sound polished generally aren’t running the priciest gear. They stopped fighting their living room and picked whichever method actually fit what they were making that day.